- Roshni: The LED Controller You Need When Standard Options Aren’t Enough
- What Makes Roshni Different
- Dual Independent Outputs
- Three Data Sources, Strict Priority
- Hardware: Teensy 4.1 + Official Ethernet Kit
- Real Performance Numbers
- Thermal Reality (Important for Large Installations)
- Common Use Cases (13 Real Configurations)
- Network & Web Interface
- Architecture: Input × Output Grid
- Quick Start (5 Minutes)
- OTA Updates & Diagnostics
- Integration Examples
- Home Assistant
- Node-RED
- HyperHDR (Ambilight)
- Known Limitations & Trade-Offs
- Roadmap
- Building from Source
- FAQ
- Ready to Build?
- Schema.org Markup
Roshni: The LED Controller You Need When Standard Options Aren’t Enough
When you’re building an ambilight system for your home theater, managing decorative LED installations across multiple rooms, or running addressable strips in a commercial art project, you face a problem that consumer-grade LED controllers weren’t designed to solve: controlling two independent LED setups from a single board, handling data from multiple sources without reflashing firmware, and doing it all with enough stability that you never think about it again.
That’s what Roshni does.
Roshni is a production-grade LED controller built on the Teensy 4.1 (a 600 MHz ARM Cortex-M7 microcontroller). It lets you drive up to two independent LED strips simultaneously, each with its own chipset, color settings, and power supply. It accepts data from three sources in strict priority order: TPM2 over USB, UDP Raw over Ethernet, or internal effects. Every function exposes via REST API, so it integrates cleanly into Home Assistant, Node-RED, or whatever you’ve built around your home.
It’s designed for people who’ve looked at WLED, QuinLED, or the various commercial ambilight kits and thought: “I need more flexibility, and I’m willing to spend time building it right.”
What Makes Roshni Different
Most LED controllers force a choice: either you drive one strip with one protocol, or you build something custom and maintain it yourself. Roshni puts the entire stack into one firmware you flash once and configure through a browser.
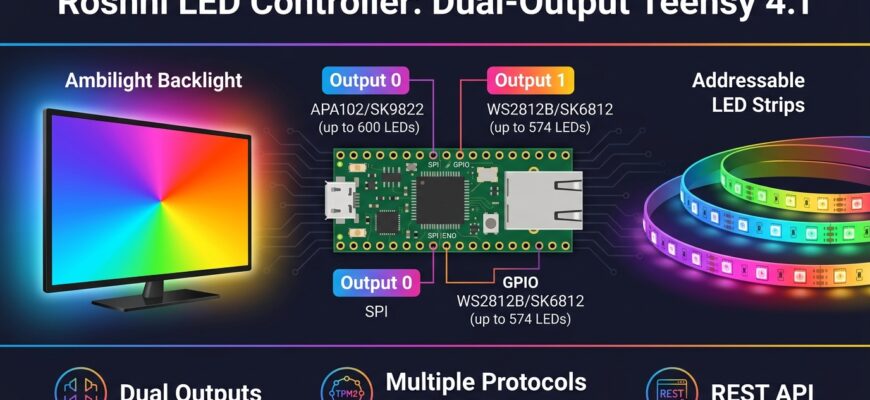
Dual Independent Outputs
You can control two completely different LED setups from a single board.
Output 0 drives APA102 or SK9822 strips (up to 600 LEDs) via SPI with dedicated clock and data lines. These run fast, handle long cable runs well, and work where you need high update rates or long distances between controller and pixels.
Output 1 drives WS2812B or SK6812 strips (up to 574 LEDs) via a single GPIO pin. Cheaper per-pixel than APA102, but timing-sensitive and better for shorter distances.
You’re not limited to running them independently. You can:
- Mirror both outputs to the same data (twin-strip ambilight doubles brightness)
- Reverse-mirror them (strips face opposite directions)
- Concatenate them into one 1200-LED display
- Run them completely separately with different data sources and effects
Each output has independent settings: chipset, color order (RGB, GRB, BGR, etc.), brightness, gamma correction, and direction. If you have two LED batches with slightly different color calibration, Roshni handles that automatically.
Three Data Sources, Strict Priority
Most LED controllers listen to one protocol. Roshni listens to three simultaneously and preempts automatically based on priority.
- TPM2 over USB — the standard HyperHDR protocol. Plug in a USB cable from your capture PC or TV and Roshni receives 50–60 FPS ambilight data immediately. Use this if you’re capturing video from a source device.
- UDP Raw on port 5568 — the Ethernet variant, preferred for consistent network access. HyperHDR, WLED, and other controllers speak UDP Raw natively. The moment a UDP frame arrives, it takes over any active internal effect.
- Web UI / Internal Effects — when no external data is present, run built-in effects: FULL (all pixels white), Fire, Breathing, Plasma, Cylon, Matrix, Rainbow, Solid colors, Strobe, or Random. Plus a palette selector and hex color fill.
- Real-time performance without frame drops
- Enough CPU headroom for diagnostics and monitoring while pushing pixels
- Hardware Ethernet through the official PJRC Ethernet Kit (no Wi-Fi interference)
- Multiple DMA channels for parallel data transfers
- Stable temperature profile (68–69 °C sustained under load)
- 50 FPS sustained (locked to video frame rate)
- 68,875 frames processed over 2,138 seconds uptime
- 0 errors
- 100% success rate
- ~1 ms per TPM2 frame latency
- ~9,800 Hz main loop frequency under stream load
- 68–69 °C CPU temperature
- Mount on aluminum profile. Drops temperature by 20–30 °C. Essential at these densities.
- Cap global brightness. Real-world ambilight rarely needs 100% white. Capping at 80% cuts peak heat by roughly 20% with no visible difference for most content.
- Derate the current budget. The planned 3× 30 A supply leaves about 30% headroom. You’ll likely never exceed 40–50% sustained draw.
- Flash firmware — Download the latest
.hexfrom Releases and use Teensy Loader, or OTA update if you already have a running version. - Connect Ethernet — Plug the cable in. Roshni requests DHCP on boot and reports its IP via serial.
- Open the web UI — Navigate to
http://in a browser./ - Configure your strip — Select chipset (APA102 or WS2812B), LED count, color order (RGB/GRB/etc.), and brightness. Hit Apply. Settings are persistent.
- Point your data source at it:
- Via Ethernet: HyperHDR → Add LED Device →
udpraw→:5568 - Via USB: HyperHDR → Add LED Device →
tpm2→ serial port, baudrate 2000000 - Performance Test — runs a loopback bench on pins 20/23, measuring real pixel propagation and error detection up to 1000 FPS
- Continuous Test — multi-mode diagnostic loop for stress testing
- Boot Logs — EEPROM storage of startup events (optional, disabled in MEM-OPT build to save RAM)
- Live Status — real-time FPS, frame count, error rate, success %, uptime, loop Hz, CPU temperature
- WS2812B is timing-critical. Distances over 2 meters require careful line termination. Use CAT5 with proper differential termination near the strip.
- APA102 is faster but costlier. About 50–70¢ per LED vs. 10–15¢ for WS2812B.
- Per-output ceiling: APA102 maxes out at 600 LEDs, WS2812B at 574 LEDs. For larger runs, concatenate outputs or use a second controller.
- Teensy 4.1 is not Wi-Fi native. The planned ESP32 Wi-Fi bridge will address this (roadmap item).
- ESP32 Wi-Fi bridge (co-processor for installations without Ethernet)
- Telemetry foundation (RAM/PSRAM/SD time-series storage with Prometheus, InfluxDB, MQTT, JSON export)
- Continuous signal integrity monitoring (extend the 1000 FPS loopback test into a production watchdog)
- Thermal monitoring (I²C temperature sensors along the strand, zone-aware brightness capping)
- Automatic line protection (health-signal-driven trip of per-output 5 V relays)
- Per-pixel degradation tracking (energy-weighted accumulators, IES TM-21-style L70 projection)
- Anti burn-in routines (pixel shifting, scheduled refresh cycles, stuck-pixel recovery from OLED playbooks)
- Alerting (webhook, MQTT, Telegram, Home Assistant with debouncing)
- Installation-specific degradation modeling
- Home Assistant HACS integration (native entities, not REST wrappers)
- Protocol expansion (E1.31/sACN, Art-Net, DDP, WLED JSON, OSC, MQTT pixel frames)
- Art installation primitives (zones, scenes, schedules, transitions, GPIO triggers, SD playback)
- mDNS/Bonjour zero-config discovery
The priority model is simple: TPM2 arrives, it becomes active. TPM2 stops, UDP Raw takes over. Both idle, internal effects resume. You never need to reflash or reconfigure anything. Just send data and Roshni switches modes automatically.
Hardware: Teensy 4.1 + Official Ethernet Kit
The Teensy 4.1 is a 600 MHz ARM Cortex-M7 with 1 MB of RAM and 8 MB of Flash. It’s roughly 2.5× faster than the ESP32-based boards most LED controllers use.
This means:
The reference build uses an industrial IP66 metal enclosure with external 5 V PSUs (2× 20 A or 3× 30 A depending on your LED density and color choices), individual circuit protection per output, and optional galvanic separation between zones. Hardware diagrams and CAT5 pinout tables are included.
Real Performance Numbers
These are from the author’s production install: rooted LG C9 OLED running HyperHDR, capturing 574 WS2812B LEDs over TPM2.
The onboard performance benchmark measures up to 1000 FPS on the loopback test (testing the output driver itself without external data). This validates the pixel pipeline under ideal conditions.
Thermal Reality (Important for Large Installations)
If you’re driving 1,000+ addressable LEDs, thermal management is not optional. It’s the difference between a stable 5-year installation and premature LED degradation.
A single APA102 LED draws roughly 60 mA at full white (20 mA per RGB channel), dissipating about 0.3 W. Across a 574-LED strand at 60 pixels/meter (9.57 meters), that’s 172 W electrical at peak, of which about 130 W becomes heat in the strip itself.
On bare flex PCB at 13.5 W/meter sustained, strip surface temperature reaches 70–90 °C. That destroys 3M adhesive backing within months and accelerates phosphor aging. Standard mitigations:
For the current 2× 20 A build (574 WS2812B), thermal stress stays within safe limits on aluminum profile with comfortable margin.
Common Use Cases (13 Real Configurations)
Roshni works best when you think about what data comes in and where it goes out. Here are 13 real configurations people are actually running:
| Configuration | Input | Output | When You’d Use This |
|—|—|—|—|
| Fully Independent | 2 different streams | 2 different outputs | TV ambilight (Output 0) + kitchen under-cabinet accent (Output 1). One board replaces two controllers. |
| Linear Concatenation | 1 stream | Both outputs in series | Single long LED run exceeds one output’s 600-LED limit. 1,000+ total LEDs. |
| Mirror Mode | 1 stream | Both outputs (same data) | Twin-strip ambilight. Strips face the same direction, brightness doubles without increasing frame rate needs. |
| Reverse Mirror | 1 stream | Output 0 forward, Output 1 reversed | Symmetric installations. Strips flank a TV or window, each gets its mirror of the data. |
| Mixed Chipsets | 1 stream | APA102 (Output 0) + WS2812B (Output 1) | Different performance/cost trade-offs in different zones. APA102 in the camera-facing zone (no flicker on video), WS2812B in decorative zones. |
| Different Sources, Different Zones | 2 different streams | 2 outputs, different chipsets | Professional install. Output 0 receives ambilight from one system, Output 1 from another. |
| Galvanic Separation | Any | Outputs on separate mains/breakers | Commercial deployments needing electrical code compliance or large power budgets. |
| Prototype + Production | Any | Output 0 (bench test), Output 1 (live) | Develop and debug without interrupting the live installation. |
| Failover | 1 stream | Both outputs (identical) | One strip backs up the other. If one fails, the other still displays. |
| Debug Overlay | 1 stream | Output 1 (content) + Output 0 (diagnostics) | Live debugging. Output 0 shows real-time FPS bars or error heatmap while Output 1 shows normal content. |
| Scale Beyond One Output | 1 stream | Both outputs concatenated | Hit the per-output limit on cable length or current. Split to two power supplies and distribution points. |
| Power Distribution | Any | 2 outputs (power-driven split) | Above 40 A, a single PSU becomes impractical. Splitting naturally gives two independent power domains. |
| Time-Based Zoning | Any | Output 0 (day), Output 1 (evening) | Schedule different zones to activate at different times. Trigger from Home Assistant or cron. |
Most users start with Mirror Mode (twin-strip ambilight) or Fully Independent (separate zones). You’ll probably discover the flexibility matrix becomes useful in ways you didn’t originally plan for.
Network & Web Interface
Roshni serves a full web dashboard directly from the controller. No separate app, no cloud dependency. Open a browser to http:// and you get three panels.
LED Configuration — Select chipset, LED count, color order, brightness, and offset per output. Settings persist to EEPROM.
Control & Effects — Toggle LEDs on/off, select from 10 built-in effects (FULL, Fire, Breathing, Plasma, Cylon, Matrix, Rainbow, Solid, Strobe, Random), pick a color from the palette or enter a hex value. Monitor live telemetry: FPS, frame count, error rate, uptime, CPU temperature.
Management — OTA firmware update uploader, EEPROM boot logs (if enabled), direct API endpoint buttons, and the performance self-test.
Every UI action maps to a REST endpoint. You don’t need the UI for Home Assistant, Node-RED, or custom dashboards. Just make HTTP calls:
GET /api/mode?name=fire          # Activate Fire effect
GET /api/power?on=1               # Master LED power on
GET /api/solid?color=FF0000       # Set solid red
GET /api/led?chipset=apa102       # Switch to APA102
POST /ota -F file=firmware.hex    # OTA update
The full API reference includes every endpoint, parameter, and response schema.
Architecture: Input × Output Grid
The real power of Roshni is how inputs and outputs decouple from each other. You choose independently.
What data enters: TPM2 (USB), UDP Raw (Ethernet), internal effects, or nothing.
How many sources: Up to three simultaneously (they preempt in strict priority).
What leaves: APA102 (fast SPI, up to 600 LEDs), WS2812B (cheaper, single-wire, up to 574 LEDs), or any chipset the FastLED library supports.
How they’re routed: Independent slices of the 1,200-LED buffer, mirrored, concatenated, reversed, or combination.
Per-output settings: Chipset, color order, brightness, gamma, direction, offset.
This flexibility is what makes Roshni work for both simple setups (plug in, configure, forget) and complex ones (art installations, commercial deployments, multi-room scenarios). You buy one board and it adapts to your needs rather than the other way around.
Quick Start (5 Minutes)
That’s it. Effects from the Web UI will automatically preempt whenever external data arrives.
OTA Updates & Diagnostics
Firmware updates happen over HTTP. No Teensy Loader, no USB required after initial setup. Upload a new .hex file through the Firmware Update panel on the web UI.
Built-in diagnostics:
Integration Examples
Home Assistant
For home automation, Roshni integrates as a simple REST device. Define commands in configuration.yaml:
rest_command:
leds_fire:
url: "http://10.0.1.59/api/mode?name=fire"
leds_off:
url: "http://10.0.1.59/api/power?on=0"
leds_solid_red:
url: "http://10.0.1.59/api/solid?color=FF0000"
Then create automations or scripts that call them. Related: see our [Home Assistant smart home setup guide](/blog/digital/home-assistant-setup/) for broader integration patterns.
Node-RED
A simple HTTP request node pointed at http:// gives you full control within your flow. Combine with MQTT, webhooks, or time-based triggers. This approach works well alongside other smart home orchestration strategies covered in [DIY IoT automation](/blog/digital/diy-iot-home-automation/).
HyperHDR (Ambilight)
Roshni is a first-class HyperHDR device. Add it as udpraw on Ethernet (recommended, lower latency) or tpm2 on USB. The author runs HyperHDR directly on a rooted LG C9 OLED, capturing the TV’s video pipeline and sending TPM2 to Roshni with zero external hardware. For TV ambilight setups, this is the lowest-latency approach available.
Known Limitations & Trade-Offs
Roadmap
Roshni’s long-term vision is to become a health and maintenance platform for large addressable LED installations, not just a pixel-pushing controller.
Near-term:
Mid-term:
Long-term:
Full technical specifications for each roadmap item are in the project documentation.
Building from Source
git clone https://github.com/razqqm/Teensy.git
cd Teensy/LED
pio run -e teensy41                 # compile
pio run -e teensy41 -t upload       # flash
pio device monitor                  # view logs
Requires PlatformIO + Teensy 4.1 board definition. Arduino IDE builds also work.
FAQ
Q: Why Teensy 4.1 and not ESP32?
A: The Teensy 4.1 is a 600 MHz Cortex-M7 with real-time guarantees and no Wi-Fi stack competing for interrupts. The ESP32 is roughly 2.5× slower and documented to hit frame-rate ceilings on mid-size installations. Roshni’s architecture leverages Teensy’s performance headroom for diagnostics, OTA updates, and web hosting without sacrificing pixel throughput.
Q: Can I use custom effects beyond the built-in ones?
A: The firmware is open-source and built with PlatformIO. You can modify src/effects.cpp and add new patterns. See the existing Plasma, Fire, Matrix implementations as templates, then recompile. OTA updates make deployment instant.
Q: What’s the minimum number of LEDs I can drive?
A: One pixel per output. Roshni works fine with 10 total LEDs if that’s your use case. The architecture scales from single-pixel diagnostics to 1,200 LEDs.
Q: How do I handle galvanic isolation for commercial installations?
A: Each PSU is independent with its own breaker and fuse. You can wire outputs to different mains inputs if electrical code requires isolation. The controller itself is isolated from the LED PSUs. /api/power?on=0 de-energizes strips via external contactor without dropping the network link.
Q: Does it work with WLED or other LED controllers?
A: Roshni speaks HyperHDR protocols (TPM2, UDP Raw). WLED and other controllers can send to Roshni as if it’s a standard HyperHDR LED device. The reverse (Roshni sending to other devices) is not currently supported.
Q: What’s the latency from input to pixel change?
A: About 1 ms for a complete TPM2 frame cycle (receive, process, output). Under normal video playback at 50 FPS, this is imperceptible.
—
Ready to Build?
Roshni is MIT licensed and free to use, modify, and redistribute. The full source code, hardware diagrams, CAT5 pinout tables, and detailed API reference are on [GitHub](https://github.com/razqqm/Teensy).
If you’re building an ambilight system, managing multi-zone LED installations, or running addressable strips in a professional context, Roshni gives you the control and stability that generic solutions don’t.
Download the latest firmware release, flash it to a Teensy 4.1, connect an Ethernet cable, and you’ll have a production-grade LED controller running in under 5 minutes.
For questions, contributions, and discussions, the project welcomes issues and pull requests. The documentation includes deep-dive architecture guides, thermal calculations, and implementation examples for everything from Home Assistant to Node-RED integration.
—
*Roshni (रोशनी) means light, radiance, and illumination in Hindi and Urdu. A fitting name for a project built to push photons reliably into the world.*
—
Schema.org Markup
{
"@context": "https://schema.org",
"@type": "FAQPage",
"mainEntity": [
{
"@type": "Question",
"name": "Why Teensy 4.1 and not ESP32?",
"acceptedAnswer": {
"@type": "Answer",
"text": "The Teensy 4.1 is a 600 MHz Cortex-M7 with real-time guarantees and no Wi-Fi stack competing for interrupts. The ESP32 is roughly 2.5× slower and documented to hit frame-rate ceilings on mid-size installations. Roshni's architecture leverages Teensy's performance headroom for diagnostics, OTA updates, and web hosting without sacrificing pixel throughput."
}
},
{
"@type": "Question",
"name": "Can I use custom effects beyond the built-in ones?",
"acceptedAnswer": {
"@type": "Answer",
"text": "The firmware is open-source and built with PlatformIO. You can modify src/effects.cpp and add new patterns. See the existing Plasma, Fire, Matrix implementations as templates, then recompile. OTA updates make deployment instant."
}
},
{
"@type": "Question",
"name": "What's the minimum number of LEDs I can drive?",
"acceptedAnswer": {
"@type": "Answer",
"text": "One pixel per output. Roshni works fine with 10 total LEDs if that's your use case. The architecture scales from single-pixel diagnostics to 1,200 LEDs."
}
},
{
"@type": "Question",
"name": "How do I handle galvanic isolation for commercial installations?",
"acceptedAnswer": {
"@type": "Answer",
"text": "Each PSU is independent with its own breaker and fuse. You can wire outputs to different mains inputs if electrical code requires isolation. The controller itself is isolated from the LED PSUs. /api/power?on=0 de-energizes strips via external contactor without dropping the network link."
}
},
{
"@type": "Question",
"name": "Does it work with WLED or other LED controllers?",
"acceptedAnswer": {
"@type": "Answer",
"text": "Roshni speaks HyperHDR protocols (TPM2, UDP Raw). WLED and other controllers can send to Roshni as if it's a standard HyperHDR LED device. The reverse (Roshni sending to other devices) is not currently supported."
}
},
{
"@type": "Question",
"name": "What's the latency from input to pixel change?",
"acceptedAnswer": {
"@type": "Answer",
"text": "About 1 ms for a complete TPM2 frame cycle (receive, process, output). Under normal video playback at 50 FPS, this is imperceptible."
}
}
]
}
Читайте на русском: Roshni: контроллер для управления адресуемыми светодиодами на Teensy 4.1


